

Using the Resources of
Tennisplayer
John Yandell
Want to learn to compare Quick Time movies of players for yourself? |
As a subscriber to Tennisplayer you are probably more than aware of--and possibly addicted to--the unprecedented video resources in our Stroke Archive. Currently Tennisplayer has almost 30,000 individual stroke clips of 65 of the greatest players in the modern game and also tennis history. 30,000 strokes of the greatest players in the game. That's a scary number.
You may have spent more hours than you'd care to admit viewing world class strokes in every position on the court and from virtually every possible angle. And hopefully you've been inspired and learned from that in a powerful way.
But did you ever wonder how else you could use this incredible resource to further your knowledge and improvement?
What if you could download any of the clips from the Stroke Archive directly to your computer? What if you could look at any of these strokes side by side with any other? Contrast Federer's forehand with Nadal's for example? Or Roger's backhand to Henin's? Actually, you can.
 |
 |
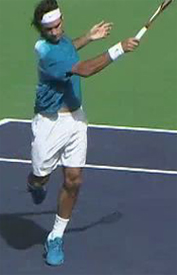 |
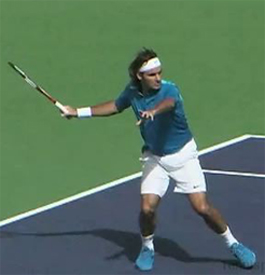
Want to create your own still photo sequences like this? |
||
OK, what if you could create still photos of key positions or still photo sequences of entire strokes? Then print them out. Put the prints in your racket bag? Well, you can.
Or take it further. What if you could easily combine and edit the clips yourself, putting them together to make your own customized stroke training videos? If that sounds hard or impossible, it's not.
And finally what if you could use Tennisplayer clips as the basis to do side by side comparisons of your own strokes with the pros? Or, if you are a coach, do the same for the strokes of your students? That's all easily doable as I am going to outline in a subsequent article.
Over the past 3 years, I've written hundreds of emails to subscribers on questions like these. The volume of these kinds of questions seems to be growing by the week, and so rather than explaining it all to every subscriber individually, I thought it would be a little smarter to put together a systematic description of what you can actually do and how.
How about creating endless loops of your favorite stroke segments? |
I don't think it's going too far to say that Tennisplayer is the most powerful interactive tool ever created for studying, improving and coaching the game of tennis. In the next two articles, we'll go over what you can do, starting with the more basic applications and progressing to the more exotic. Exotic yes, but still simple in execution. It's just a question of knowing the right steps or, should I say, knowing what to click where and when.
Now, before we begin, just one word of warning in case any of you are thinking,"This is great, now I can start my own site!" The material is all still the exclusive copyright of Tennisplayer.net. We want you to use it for your own personal educational and viewing pleasure. But we draw the line at any commercial uses of the media per se.
If you're a coach you can use it to your heart's content with your students and even burn the clips to disk--but that's different. We scan the web on a regular basis and my lawyer William F. Wraith III (a 5.0 player and original Tennisplayer subscriber) is a great guy--unless you get on the wrong side of the law. We have actually had to drag people in federal court, but really we don't want to, so just enjoy.
 |
No, Steve is not paying us commission on Quick Time Pro upgrades. |
The Magic of Quick Time Pro
To start with you'll need one thing first: a software upgrade to Quick Time Pro. Quick Time Pro is the supercharged version of the free Quick Time software that you use on the site to view the stroke sequences in the Archive.
You get the Pro version as an online upgrade. (Click Here.) Go to the Apple site, give Steve Jobs his $30, and he will email you a "key" and directions about how to enter it into your standard version of Quick Time. This will activate the "Pro" functionality.
In a world of bloated, expensive, dysfunctional software, Quick Time Pro is a jewel. It's a simple, powerful, reliable tool with fantastic capabilities for use with our material--and no I'm not getting some kind of percentage kick back from Steve Jobs. I just love it. So here's what it will do.
Downloading Clips
Most people have certain favorite clips on the site that they view over and over. With Quick Time Pro you can download them directly onto your computer. This make them super easy to access. You don't even have to be on line. You just open up the Quick Time file of the stroke and there you are.
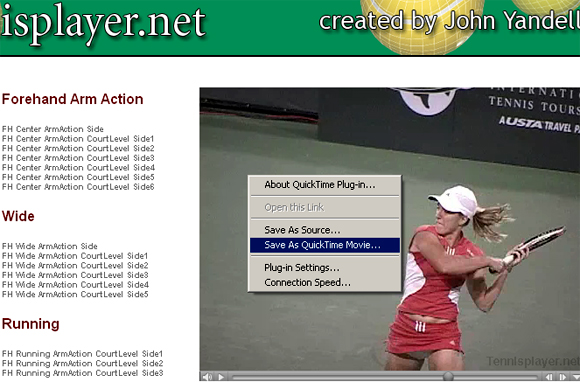 |
Right click after the clip plays and "Save As Quick Time Movie." |
How do you do it? First go to the clip in the Stroke Archive. Click on it and let it play once on the site. (If you don't play it once in the viewing window, you won't be able to download it.) Now put the cursor over the window on the Stroke Archive page and Right Click.
You'll see an option that says "Save as Quick Time Movie." Click on that. Now Quick Time Pro will give you the option of saving it anywhere on your system, just the way you would save a word document or a spread sheet. So pick a spot. Probably the best idea is to create a folder or series of folders.
One point to note: If you want rename a particular stroke and call it something like "My hero's great forehand" make sure you add ".mov" to the end of the name. (That's called a file extension.) Otherwise your computer may not recognize it and Quick Time may not be able to play it. It's also better to download it first and then change the name once you have the clip locally in your system.
After the download, the next step is to go to wherever you saved the clip and just click on it. The stroke movie will open on your screen and you can then play it frame by frame remotely on your computer, the same way you normally do on the site.
You can group the movies you download however you want. The way I do it is by stroke type. For example, I have a folder called Forehand Stroke Models, where I store the forehand examples I like to use with my own students. The same for backhands, serves, volleys, etc.
What if, for example, you wanted to group your 5 favorite Roger Federer forehands together in one place? Same idea. The choice about how many strokes you download and how you store them is yours. Theoretically you could download all 30,000 clips, but that might take you a while.
 |
Open two or more Quick Time movies side by side on your desktop. |
Pros Side by Side
One of the great things about Quick Pro is that once you have downloaded multiple stroke clips, you can study them side by side. You do this by opening additional Quick Time movie windows.
To do this, go to the File menu on the upper right. Now Click on New Player. Now go to File again on the New Player and just navigate to wherever you stored the other movie or movies you want to open. Or you can just go to the folder and click on the individual movies there.
You can look at two forehands. Just click back and forth between the windows and advance frame by frame. This is how I compare key positions in the strokes. You can have two or four or six or eight windows or more open and go back and forth. There is almost no limit to the number of stroke movies you can have open at once. I know because when I was working with a certain top hundred tour player who will remain nameless, he had me navigating back and forth between dozens of movies of different strokes of multiple players while we were exploring the mysteries of the platform stance and the two-handed backhand.
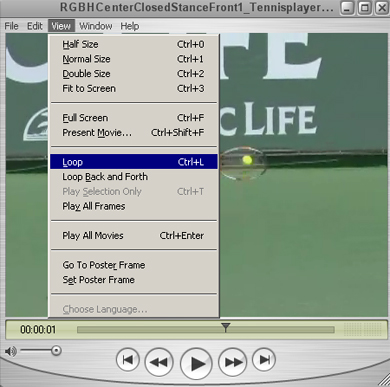 |
The loop function gives you continuous play. |
With Quick Time Pro you also have a lot of choices about how to play the clips back, both in terms of size and speed. Those options are all on the menu bar under View. You can play clips back in a continuous loop, so you watch the stroke over and over. You can play it backwards. You can change the size of the movie window. You make it full screen if you want.
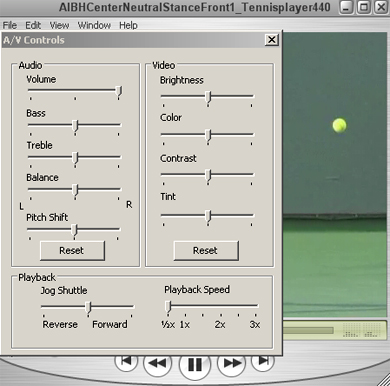 |
AV Controls let you choose the speed and direction of the clip and a lot of arty stuff too. |
You also have control of the speed of the playback. That's on the Menu Bar under Window. Select AV Controls. At the bottom look at Play Back Speed and slide the bar to the left to slow the movie down to half speed. Or go the other way if you want to speed it up.
If you look at the options in AV Controls you'll see you can do a lot of other things to the clips as well. Change the way they look, for example, by manipulating the contrast, the brightness and color. If you get something you consider to be artistic, then you can save the clip in that form just by using "Save As" under File. Be sure to save it as a "Self-Contained Movie."
The end resutl is that you can take your favorite stroke or strokes, put them on half speed and continuous loop, and have them there on your desk top playing all day, so you can subliminally absorb pro technique while you are, allegedly, working for a living. And yes, I know people who do this and swear by it.
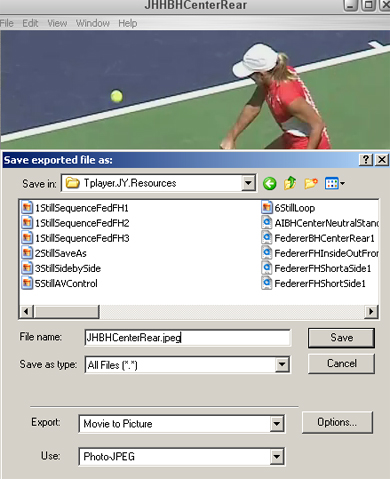 |
You can export any frame to still image. |
Still Images
You can also use Quick Time Pro to make still images of any frame in any movie in the Stroke Archive. You can save the stills on your computer or print them out. To do this all you have to do is advance the stroke to the particular frame you have in mind. Now under File select Export. Under Export, select Movie to Picture. Under Use choose Photo JPEG. Again, pick the place you want to save it and click Save. You can print it out by just clicking on it where you stored it. It'll open in a Quick Time still photo viewer, and then, under File, just click Print.
You can also make create still photo sequences by saving multiple frames. You just pick the still photos you want one at a time, as above. But you can also create stills of every single frame in the stroke sequence in one operation. This is called creating an Image Sequence. Again go to File, then Export. In the Export box choose Movie to Image Sequence. In the Use box pick JPEG 29.95 fps. Then hit Save. A typically Tennisplayer stroke is 60 to 80 still frames, so better put those in a folder somewhere unless you want 60 or 80 JPEG files landing on your desktop.
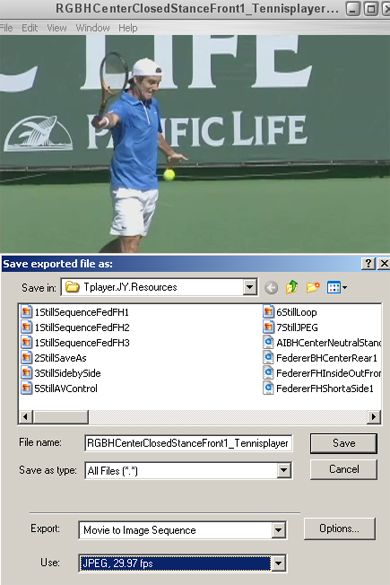 |
Exporting as an Image Sequence will create a still photo of every frame. |
Now from there you can select the key frames you want to print. Go to the folder and right click on the first JPEG. Choose the "Open With" option and then select the Windows Photo viewer. This will allow you to click through the whole sequence. When you find one you want to print you can select that at the bottom with the printer icon.
One word on the image size. The graphics on Tennisplayer are optimized to look great on the web, and also to download at a reasonable speed on a fast connection. So when you print, don't think you can blow them up to the size of a movie poster. You'll find that you'll quite quickly lose resolution as you go up in size. But if you stay with the original size of the images, or a little bigger, they'll look really great printed out as well. You can put them up on your walls, your bulletin board, your shaving mirror, or wherever. It's a great way to torment your non-tennis playing loved ones.
 |
Another incredible source for still images: Tour Portraits. |
Tour Portraits
There's another source of incredible still photos on the site other than the Stroke Archive. And that's the work done by J. Gregory Swendsen and our other still photographers in the Tour Portraits section. To me this is one of the least explored and the most underrated areas on Tennisplayer. True, you can't look at the strokes frame by frame in the same way as in the Stroke Archive. But sometimes less is more, and one key picture can have as much or more impact as an entire sequence. Then there's the emotional dimension Greg strives to capture--not to mention the pure aesthetics of a lot of his shots.
The point is that you can download any image from any slide show in Tour Portraits and save it and/or print it as a still image. And it's actually even easier than the process with Quick Time. Here's how.
Open up one of the slide shows and let it run. When you get to the shot you want, click pause. Now just right click on the picture itself. This takes you to an even higher quality version of the same image. Now right click on that image. Select "Save As" and again, create a place in your hard drive to save it, and click. That's it. You can edit further as well, if you wish, if you work in Photoshop or other stil photo editing programs. (You can do that as well with the stills you produce Quick Time.)
As with the Quick Time stills, you can open the Tour Portraits images you save and scan through them with Windows Picture Viewer. You can print them from that as well. In general the quality with be fantastic, a level higher than the resolution on the stills from the Stroke Archive sequences, so you can go to somewhat bigger prints if you want.
Custom Clips
Next there's that Stroke Archive editing thing I was taking about. If you've done any video editing you know it's not really that big a deal, but if you haven't, just reading the words may scare you. Friends, if you can copy and paste, you can do simply edits with Quick Time Pro and here's how.
Let's say you want to string 2 Roger clips together. Or 3 or 5 or 20 clips for that matter. Or different players, or a mix of players, or a mix of strokes. All that's completely up to you.
First download the clips you want to use. Then open them up on the desk top. Now put your cursor on the movie slide bar underneath the first movie. Watch the two little triangles appear just below the slide bar on the left end. Now drag the right triangle down to the end of the slide bar. Note how the slide bar changes color to a darker gray.
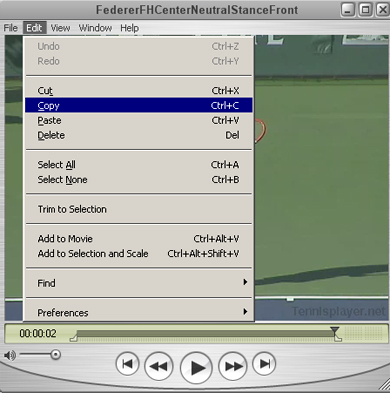 |
The triangles below the slider bar allow you to copy and then paste. |
Now under Edit chose Copy. Then go to File and choose New Player. Then, in that New Player you just opened, go to Edit and choose Paste. Hit plaste and there's your first clip added.
2 Federer forehands edited together in Quick Time, set on Loop. |
Now go to the next clip you want to add and do the exact same thing. Drag the triangle. Copy. Then go back to that New Player you opened. Make sure the triangle on the top of the slider is down at the end of the slide bar. Now Paste! Then just hit play and watch the two strokes one after the other! If you want to add more clips, keep going. Add as many clips of whatever strokes you want. Our contributor David Bailey did this and created dozens of clips of of players doing all the Contact Moves he's discovered. (Click Here for David's articles.)
Remember you can chose to put any of your edited movies on Loop under View so they play over and over. And also you can slow them down by going to AV Controls under Window. Pretty cool.
When you are done, you can save your creation as an independent Quick Time movie that you can open and play just like any of the other ones you've downloaded off the site. Just go to File and choose Save As. Make sure you choose to save it as a Self-Contained movie.
A front view and side view of Gasquet's forward swing on his backhand. |
Now what if you want to get really artsy and create a movie of just one part of a clip? Say from the start of the forward swing out through the contact? Or maybe string parts of several clips together? Right, exactly the kind of stuff we do on the site in the articles. That may seem hard to believe but it's easy. Again, just remember, do not start your own site.
So just do the same thing with the little triangles. But drag them just to the start and finish of the parts of the clips you want. Then go to Edit, select Copy. Then go to New Player. Paste. And repeat for as many segments as you want. Save it as a Self-Contained Movie, and there you are.
So that's a good start. In Part 2 next month, we'll take it to the next level. How do you set yourself side by side with the pros? The top teaching pros in the world are doing this for their players. I've had the pleasure of doing it for a few players who won Grand Slams, and a lot of other players at all levels. Now you're going to learn how to do it for yourself. There are multiple ways using both Macs and/or PCs, and we'll review the main ones, and also the simplest options. Stay Tuned.

